6.828Lab1
PC Bootstrap
The PC’s Physical Address Space
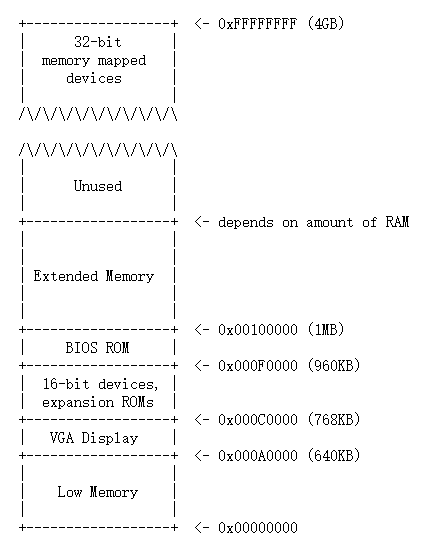
- 早期PC,16位,只有可用物理地址只有1M(0x00000000~0x000FFFFF)
- 最重要的部分是**Basic Input/Output System (BIOS)**,它占据从0x000F0000到0x000FFFFF的64KB区域。在早期的pc机中,BIOS保存在read-only memory (ROM)中,现在pc机将BIOS存储在updateable flash memory(可更新的闪存)中。
- BIOS负责执行基本的系统初始化,如激活显卡和检查已安装的内存数量。在执行此初始化之后,BIOS从某些适当的位置(如 floppy disk(软盘), hard disk, CD-ROM, or the network)加载操作系统,并将机器的控制权传递给操作系统。
- 虽然现在可以处理器支持4GB的物理地址空间了,但还是保留那1MB的物理地址的设定来向后兼容
Exercise 3
学习boot.s,main.c,boot.asm,了解在GDB中执行the boot loader时发生了什么?
在地址 0x7c00 处设置断点,它是加载后的引导扇区的位置。继续运行,直到那个断点。在 boot/boot.S 中跟踪代码,使用源代码和反汇编文件 obj/boot/boot.asm 去保持跟踪。
在 boot/main.c 文件中跟踪进入 bootmain() ,然后进入 readsect()。识别 readsect() 中相关的每一个语句的准确汇编指令。跟踪 readsect() 中剩余的指令,然后返回到 bootmain() 中,识别 for 循环的开始和结束位置,这个循环从磁盘上读取内核的剩余扇区。找出循环结束后运行了什么代码,在这里设置一个断点,然后继续。接下来再走完引导加载器的剩余工作。
完成之后,就能够回答下列的问题了:
- 处理器开始运行 32 代码时指向到什么地方?从 16 位模式切换到 32 位模式的真实原因是什么?
1 | # Jump to next instruction, but in 32-bit code segment. |
在boot.asm 这里切换到32位代码。应该是经过64与60端口的控制,加载完GDT表后,CRO的bit0位为1,此时机器已处于保护模式,故处理器从16位模式转为32位模式。
全局描述表(GDT Global Descriptor Table):在保护模式下一个重要的数据结构。用来存储内存的分段信息。
GDT可以被放在内存的任何位置,那么当程序员通过段寄存器来引用一个段描述符时,CPU必须知道GDT的入口,也就是基地址放在哪里,所以Intel的设计者门提供了一个寄存器GDTR用来存放GDT的入口地址,程序员将GDT设定在内存中某个位置之后,可以通过LGDT指令将GDT的入口地址装入此寄存器,从此以后,CPU就根据此寄存器中的内容作为GDT的入口来访问GDT了。
- 引导加载器执行的最后一个指令是什么,内核加载之后的第一个指令是什么?
引导加载程序的最后一条指令是boot/main.c中bootmain函数最后的((void (*)(void)) (ELFHDR->e_entry))(); 这个第一条指令位于/kern/entry.S文件中,第一句 movw $0x1234, 0x472


- 内核的第一个指令在哪里?
位于/kern/entry.S文件中
- 为从硬盘上获取完整的内核,引导加载器如何决定有多少扇区必须被读入?在哪里能找到这些信息?
通过ELF program headers决定,他在操作系统内核映像文件的ELF头部信息里找到。
Examine the full list of the names, sizes, and link addresses of all the sections in the kernel executable by typing:
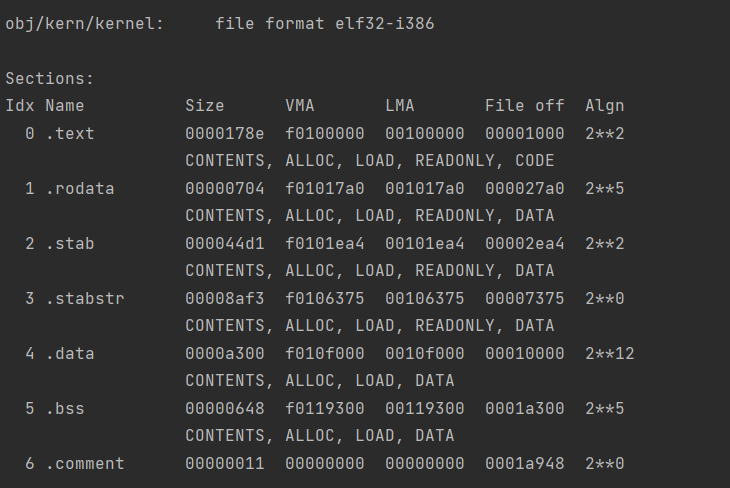
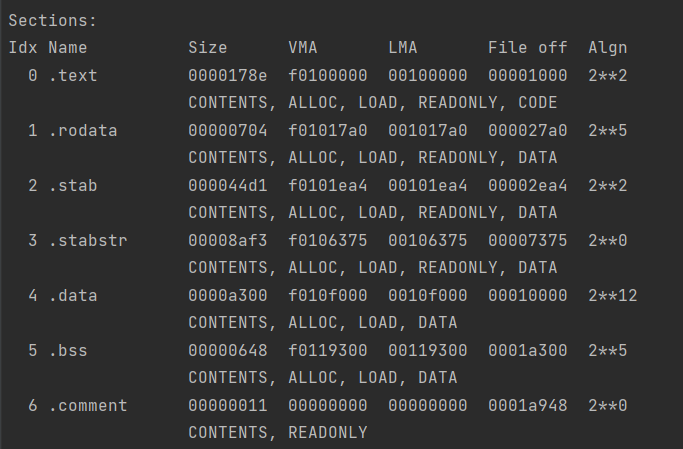
.text:程序的可运行指令。.rodata:只读数据,比如,由 C 编译器生成的 ASCII 字符串常量。(然而我们并不需要操心设置硬件去禁止写入它).data:保持在程序的初始化数据中的数据节,比如,初始化声明所需要的全局变量,比如,像int x = 5;。
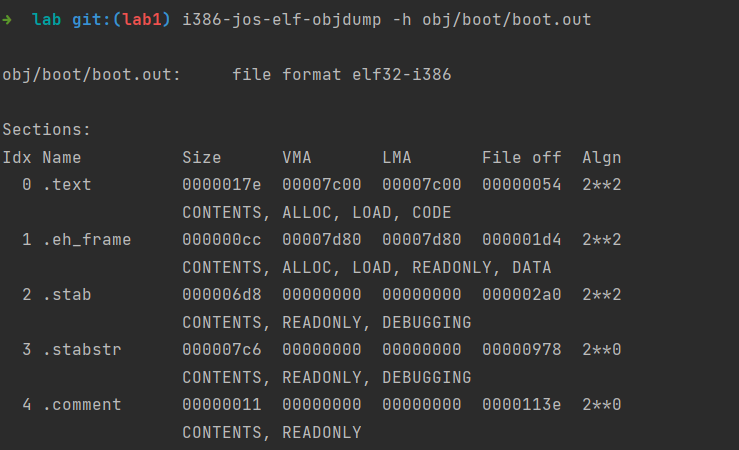
look at the .text section of the boot loader:
Exercise4
下载 pointers.c 的源代码,运行它,然后确保你理解了输出值的来源的所有内容。尤其是,确保你理解了第 1 行和第 6 行的指针地址的来源、第 2 行到第 4 行的值是如何得到的、以及为什么第 5 行指向的值表面上看像是错误的。
1 |
|

如果先将c转化为字符串,再直接对字符串+1,这样导致c实际地址就是+1,从0x7fffd33e72c4到0x7fffd33e72c5
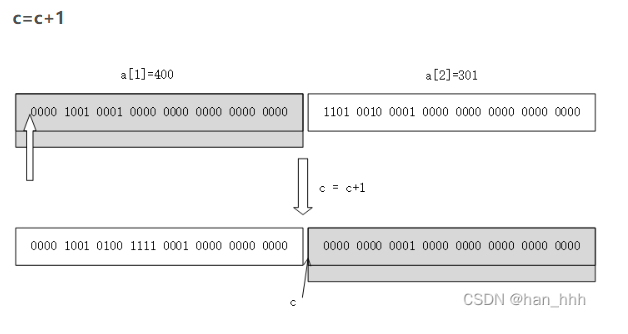
c = (int *) ((char *) c + 1) 与c=c+1的区别
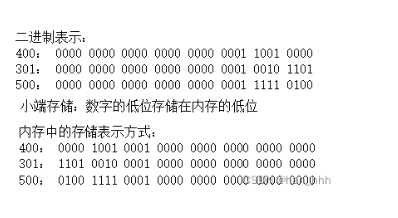
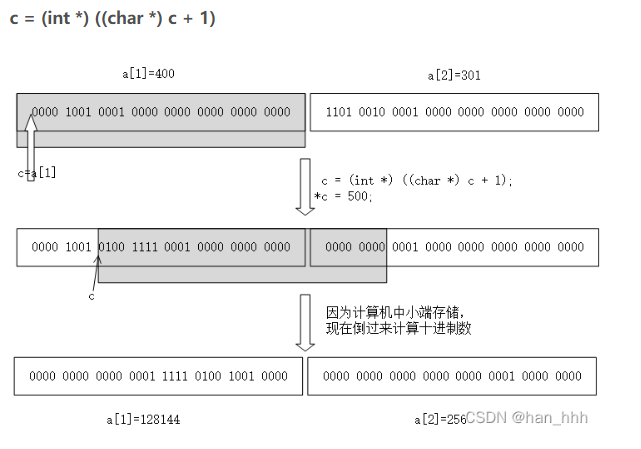
转换为char后,c只向前移动了1位,即八个bit。
*c=500,将灰色框内的值变为500.
其他
如果int *p=(int*)100,则(int)p+1和(int)(p+1)不同,前者是101,但后者是104。当指针加整数时,向第二个例子,整数隐式乘以指针所指向的对象的大小。
p[i]定义为和*(p+i)相同,代表p指向的内存的第i个对象,当对象大于1字节时,这条规则起作用
&p[i]和(p+i)相同,代表p指向的内存的第i个对象的地址
在对内存地址进行加法时,要确定他是integer addition or pointer addition
ref: https://blog.csdn.net/han_hhh/article/details/121701438
Exercise 5
内核的文件头:
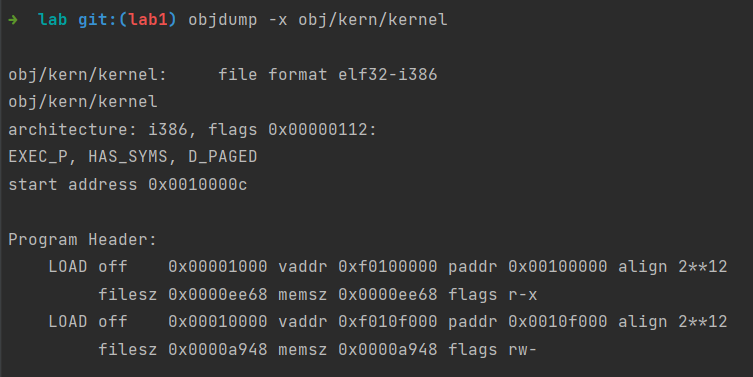
得到了Program Header文件头,上面省略了余下的一些输出内容。每个LOAD都是一个ELF对象,里面包含了相对本文件的索引off、虚拟内址vaddr、物理地址paddr、对齐align、对象在文件和内存中的大小filesz, memsz。
这个header在bootmain函数中通过readseg函数加载到了内存中,位置在0x10000,并通过一个宏ELFHDR索引。header中存放的数据采用的是默认的对齐方式,所以可以直接通过一个struct Elf指针访问各个属性。
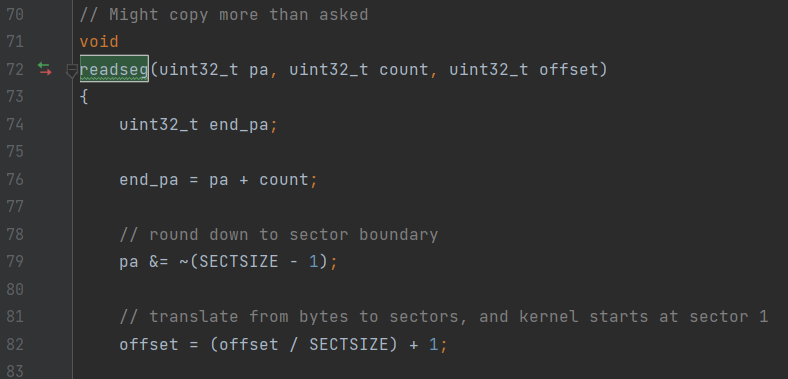
在文件头struct Elf中,我们拿到了关于结构体struct Proghdr数组的信息e_phoff。从这个数组的成员中,我们拿到了关于每个segment的信息,也就可以把它们正式从硬盘中拷贝到内存中的指定位置。
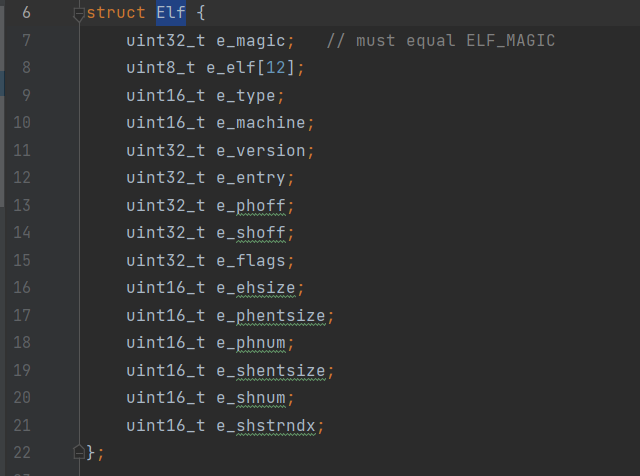
第一个segment对象的地址存放在ELFHDR->e_phoff中,是从硬盘中读入的原始数据。转化为指针如下:
1 | ph = (struct Proghdr *) ((uint8_t *) ELFHDR + ELFHDR->e_phoff); |
也就是加上了一个偏置。同样利用elf文件的数据,查出这个“对象数组”的长度,也就可以遍历这个Proghdr数组了:
1 | for (; ph < eph; ph++) |
ph是个struct Proghdr类型的指针,直接++让地址的值前进相应地址长度,非常方便。
至此,内核完全加载完毕。
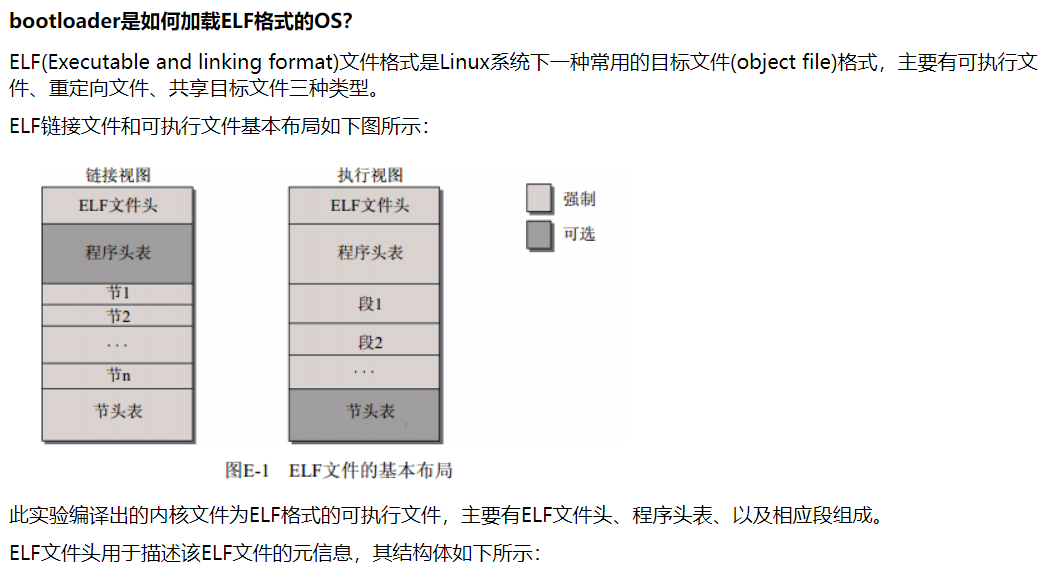
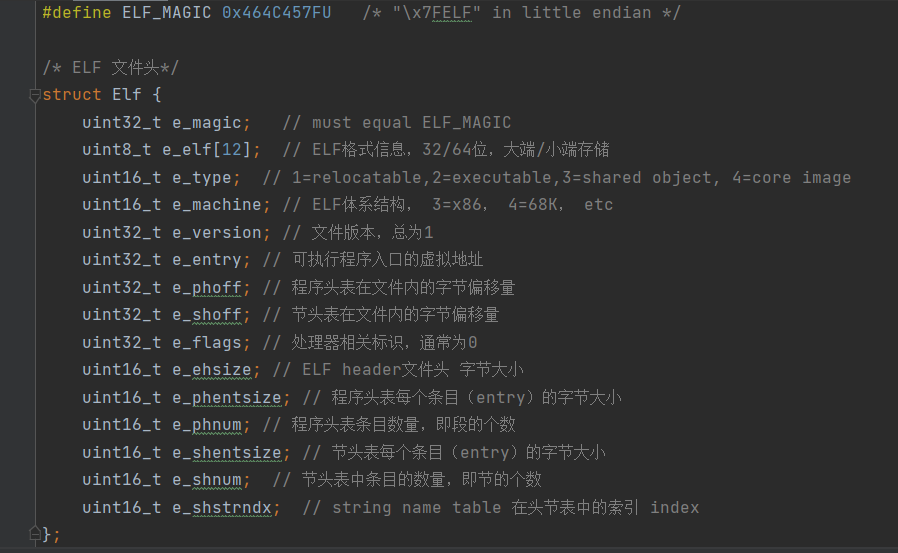

获取kernel ELF文件的相关信息:
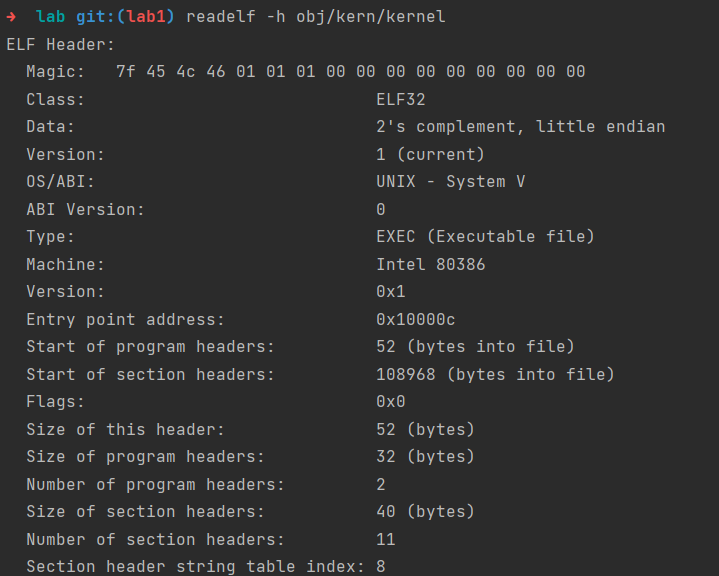
可看到程序入口的虚拟地址是0x10000c,程序头表偏移为52B,程序头表条目是2.
如果你得到一个错误的引导加载器链接地址,通过再次跟踪引导加载器的前几个指令,你将会发现第一个指令会 “中断” 或者出错。然后在 boot/Makefrag 修改链接地址来修复错误,运行 make clean,使用 make 重新编译,然后再次跟踪引导加载器去查看会发生什么事情。不要忘了改回正确的链接地址,然后再次 make clean!
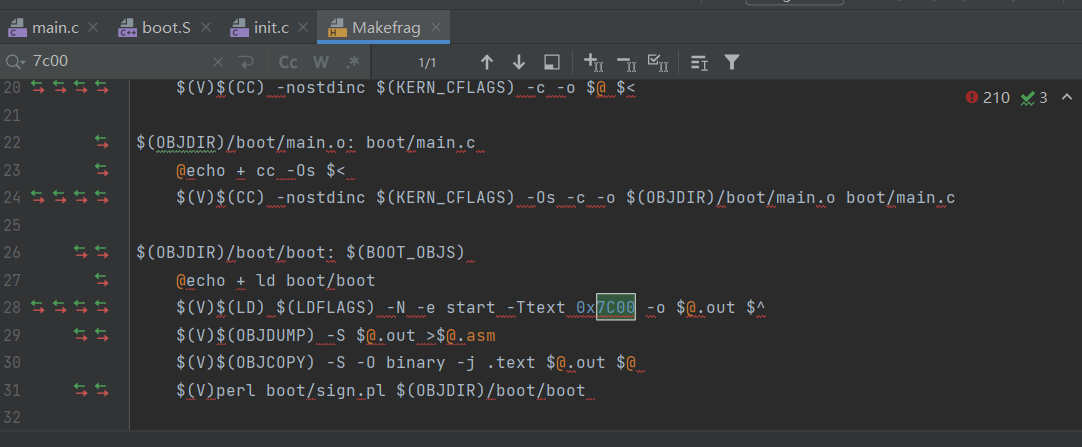
修改0x7C00为0x7d00,使得bootloader无法正确加载。
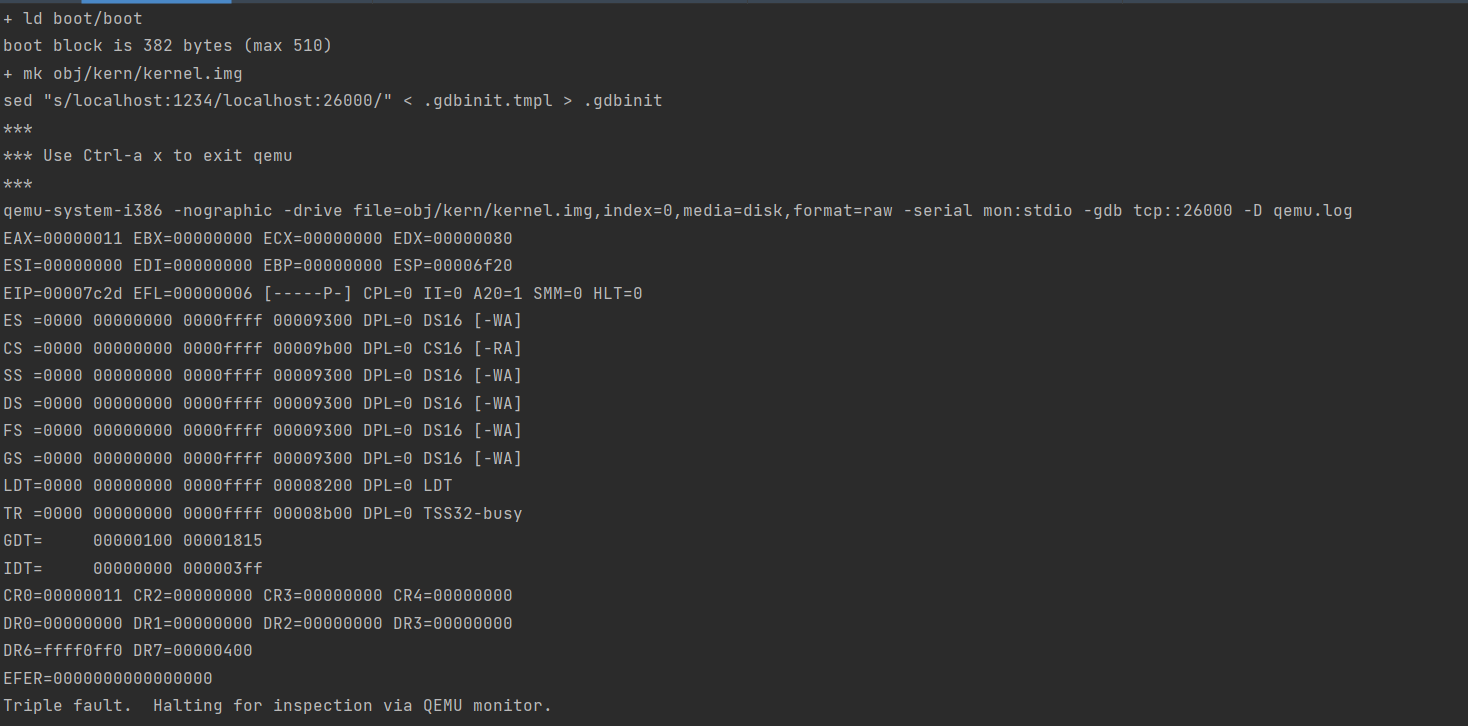
可能就是GDT表加载错误才导致后面加载失败,因为加载信息都错掉了。
Exercise 6
在BIOS进入 the boot loader时检查内存0x00100000处的8个字,然后在 the boot loader进入内核时再检查一次。

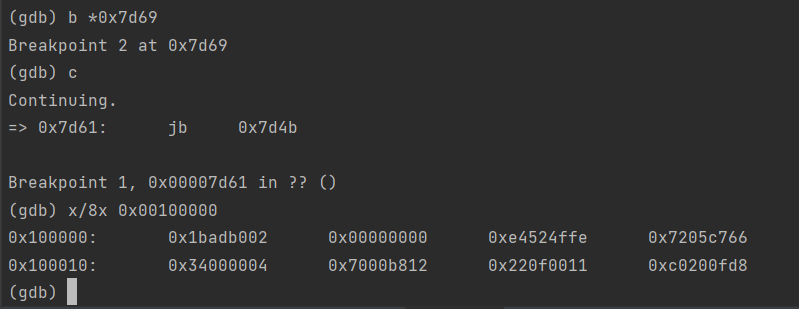
0x00100000往后8个字前后不一样应该是由于bootmain将内核的某个section存入了该地址处。由于要在进入内核时再看一次,故第二个断点应该设置在call entry处,
即 *b 0x7d69
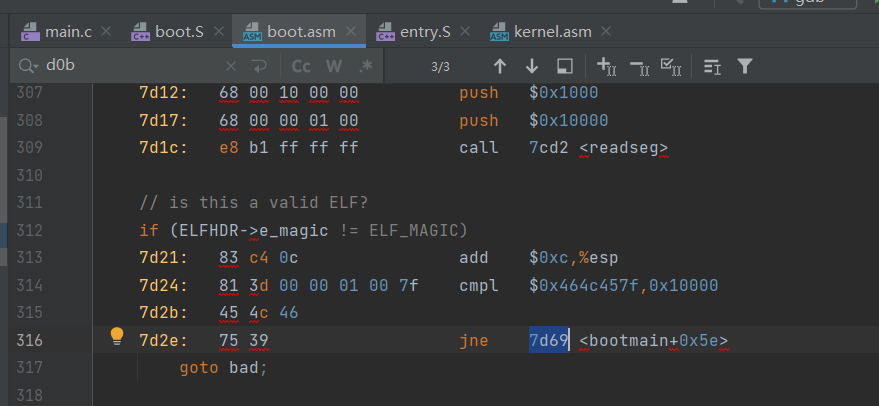
内核的入口地址是0x0010000c,也在此范围中,可能是.text段的内容,因为内核最先加载的就是.text
➜ lab git:(lab1) objdump -x obj/kern/kernel
obj/kern/kernel: file format elf32-i386
obj/kern/kernel
architecture: i386, flags 0x00000112:
EXEC_P, HAS_SYMS, D_PAGED
start address 0x0010000c
Program Header:
LOAD off 0x00001000 vaddr 0xf0100000 paddr 0x00100000 align 212
filesz 0x0000ee68 memsz 0x0000ee68 flags r-x
LOAD off 0x00010000 vaddr 0xf010f000 paddr 0x0010f000 align 212
filesz 0x0000a948 memsz 0x0000a948 flags rw-
Sections:
Idx Name Size VMA LMA File off Algn
0 .text 0000178e f0100000 00100000 00001000 22
CONTENTS, ALLOC, LOAD, READONLY, CODE
1 .rodata 00000704 f01017a0 001017a0 000027a0 25
CONTENTS, ALLOC, LOAD, READONLY, DATA
2 .stab 000044d1 f0101ea4 00101ea4 00002ea4 22
CONTENTS, ALLOC, LOAD, READONLY, DATA
3 .stabstr 00008af3 f0106375 00106375 00007375 20
CONTENTS, ALLOC, LOAD, READONLY, DATA
4 .data 0000a300 f010f000 0010f000 00010000 212
CONTENTS, ALLOC, LOAD, DATA
5 .bss 00000648 f0119300 00119300 0001a300 25
CONTENTS, ALLOC, LOAD, DATA
6 .comment 00000011 00000000 00000000 0001a948 20
CONTENTS, READONLY
The kernel
Exercise 7
在0x0010000c处打上断点,si单步执行,直到 movl %eax, %cr0 前一步
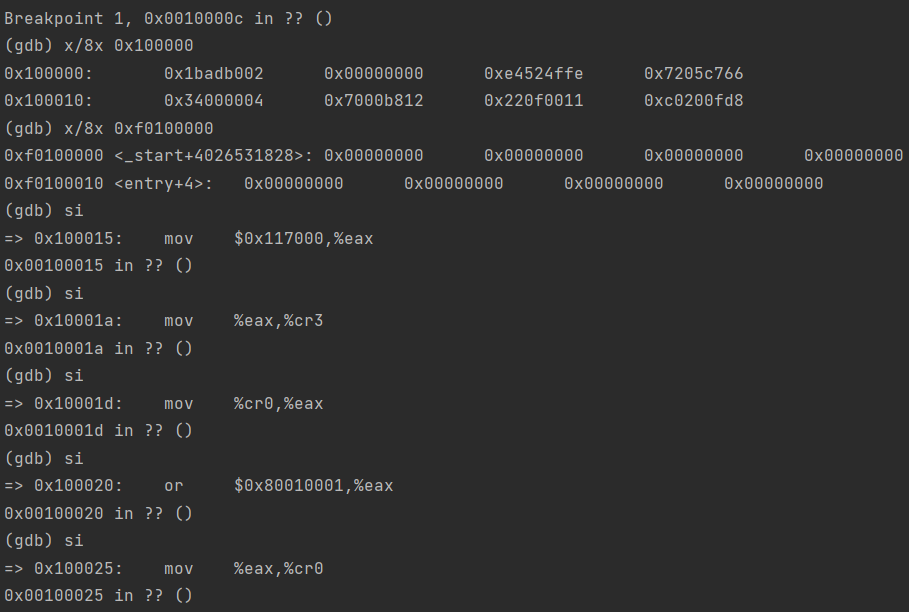
查看0x00100000 和 0xf0100000 的内容

执行movl %eax, %cr0 , 再次查看内容

发现VMA和LMA有相同的内容,这是因为分页后,0x00100000 被映射到了 0xf0100000 处,完成了分页操作。
make clean 后,注释掉movl %eax, %cr0 (kern/entry.S)
重新运行

qemu-system-i386 -nographic -drive file=obj/kern/kernel.img,index=0,media=disk,format=raw -serial mon:stdio -gdb tcp::26000 -D qemu.log -S
qemu: fatal: Trying to execute code outside RAM or ROM at 0xf010002c
EAX=f010002c EBX=00010074 ECX=00000000 EDX=000000d5
ESI=00010074 EDI=00000000 EBP=00007bf8 ESP=00007bec
EIP=f010002c EFL=00000086 [–S–P-] CPL=0 II=0 A20=1 SMM=0 HLT=0
ES =0010 00000000 ffffffff 00cf9300 DPL=0 DS [-WA]
CS =0008 00000000 ffffffff 00cf9a00 DPL=0 CS32 [-R-]
SS =0010 00000000 ffffffff 00cf9300 DPL=0 DS [-WA]
DS =0010 00000000 ffffffff 00cf9300 DPL=0 DS [-WA]
FS =0010 00000000 ffffffff 00cf9300 DPL=0 DS [-WA]
GS =0010 00000000 ffffffff 00cf9300 DPL=0 DS [-WA]
LDT=0000 00000000 0000ffff 00008200 DPL=0 LDT
TR =0000 00000000 0000ffff 00008b00 DPL=0 TSS32-busy
GDT= 00007c4c 00000017
IDT= 00000000 000003ff
CR0=00000011 CR2=00000000 CR3=00117000 CR4=00000000
DR0=00000000 DR1=00000000 DR2=00000000 DR3=00000000
DR6=ffff0ff0 DR7=00000400
CCS=00000084 CCD=80010011 CCO=EFLAGS
EFER=0000000000000000
FCW=037f FSW=0000 [ST=0] FTW=00 MXCSR=00001f80
FPR0=0000000000000000 0000 FPR1=0000000000000000 0000
FPR2=0000000000000000 0000 FPR3=0000000000000000 0000
FPR4=0000000000000000 0000 FPR5=0000000000000000 0000
FPR6=0000000000000000 0000 FPR7=0000000000000000 0000
XMM00=00000000000000000000000000000000 XMM01=00000000000000000000000000000000
XMM02=00000000000000000000000000000000 XMM03=00000000000000000000000000000000
XMM04=00000000000000000000000000000000 XMM05=00000000000000000000000000000000
XMM06=00000000000000000000000000000000 XMM07=00000000000000000000000000000000
make: *** [qemu-nox-gdb] Aborted (core dumped)
由于未开启分页机制,虚拟地址还未映射到物理地址。
Exercise 8
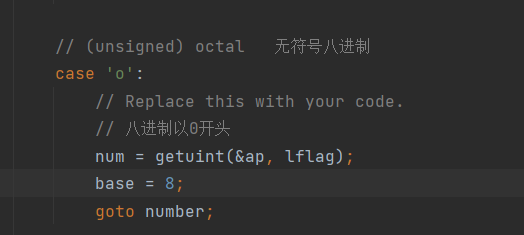
补全”%o”
problem 1
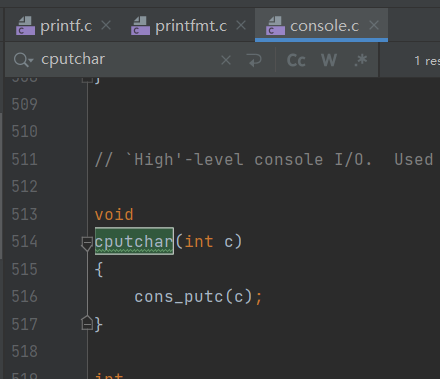
解释printf.c和 console.c之间的接口。具体来说, console.c导出什么函数 ?printf.c如何使用这个函数 ?
1 | // printf.c |
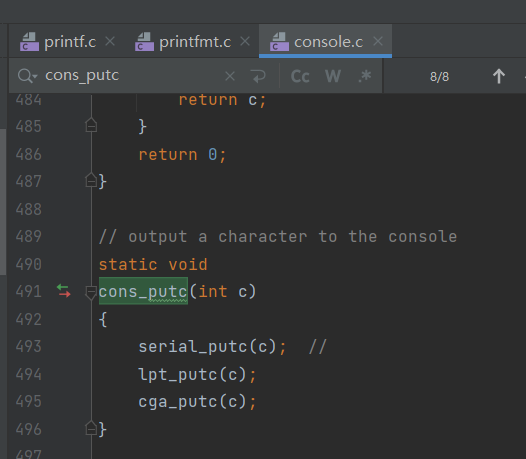
1 | /* |
1 | /***** Parallel port output code *****/ |
1 | static void |
problem 2
从console.c
解释以下内容:
1
2
3
4
5
6
71 if (crt_pos >= CRT_SIZE) {
2 int i;
3 memmove(crt_buf, crt_buf + CRT_COLS, (CRT_SIZE - CRT_COLS) * sizeof(uint16_t));
4 for (i = CRT_SIZE - CRT_COLS; i < CRT_SIZE; i++)
5 crt_buf[i] = 0x0700 | ' ';
6 crt_pos -= CRT_COLS;
7 }
见上
problem 3
For the following questions you might wish to consult the notes for Lecture 2. These notes cover GCC’s calling convention on the x86.
Trace the execution of the following code step-by-step:
1
2int x = 1, y = 3, z = 4;
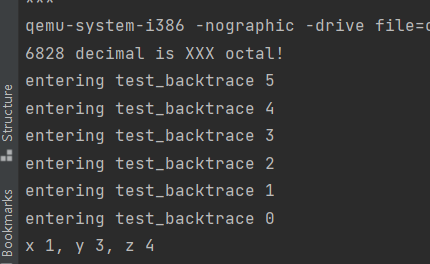
cprintf("x %d, y %x, z %d\n", x, y, z);- In the call to
cprintf(), to what doesfmtpoint? To what doesappoint? - List (in order of execution) each call to
cons_putc,va_arg, andvcprintf. Forcons_putc, list its argument as well. Forva_arg, list whatappoints to before and after the call. Forvcprintflist the values of its two arguments.
- In the call to
对于以下问题,您可能希望查阅第 2 讲的注释。这些注释涵盖了 GCC 在 x86 上的调用约定。
逐步跟踪以下代码的执行:
1 | int x = 1, y = 3, z = 4; |
1
- 在调用 to
cprintf()时,fmt指向什么?ap指向什么? - 列出(按执行顺序)对
cons_putc、va_arg和vcprintf的每个调用。对于cons_putc,也列出它的argument。对于va_arg,列出ap调用前后所指向的内容。列出它的两个参数的vcprintf值。
将代码复制到该位置
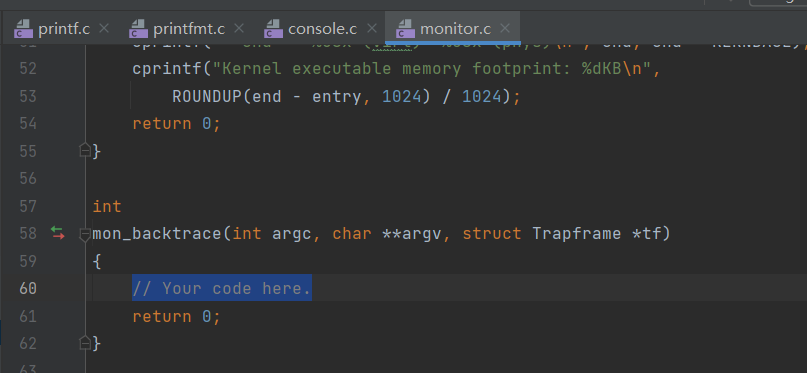

在gdb给该行打断点

disassemble 反汇编当前代码段的部分指令
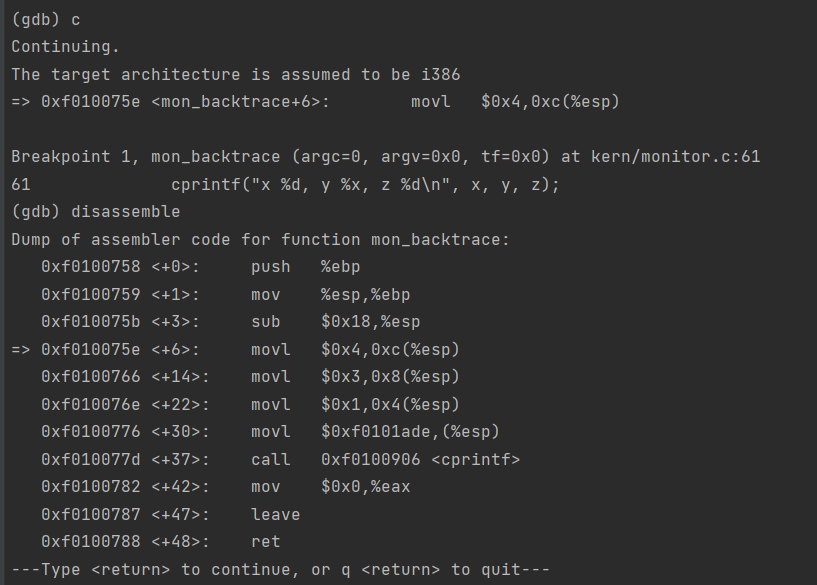
在kernel.asm中查找该地址
(vim命令模式下,/+查找字符是向下查找,?是向上查找。 如果你要继续查找此关键字,敲字符n就可以继续查找了)
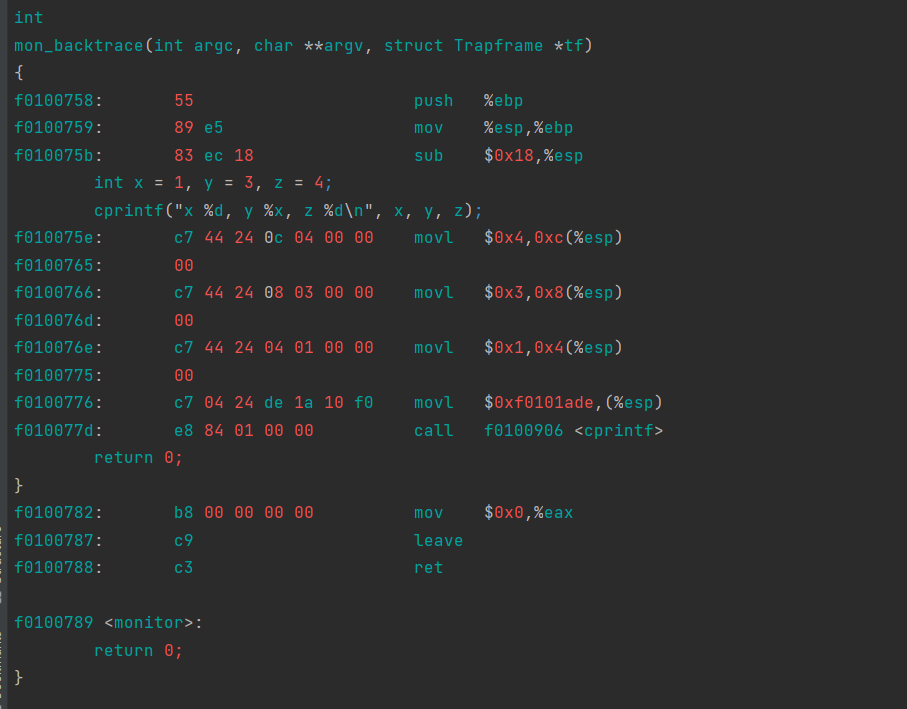
call 0xf0100906 <cprintf>
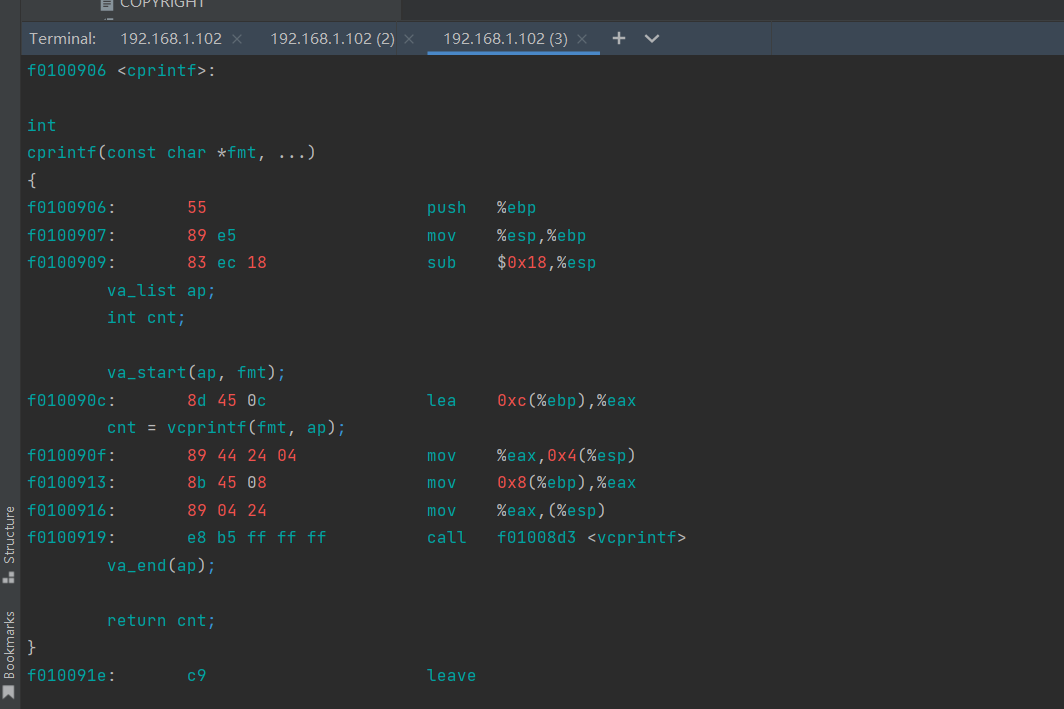
va_start,函数名称,读取可变参数的过程其实就是在栈区中,使用指针,遍历栈区中的参数列表,从低地址到高地址一个一个地把参数内容读出来的过程·
可以看到 fmt 是 cprintf 函数的第一个参数,即指向字符串"x %d, y %x, z %d\n"的指针。
ap 指向第二个参数的地址。注意 ap 中存放的是第二个参数的地址,而非第二个参数。
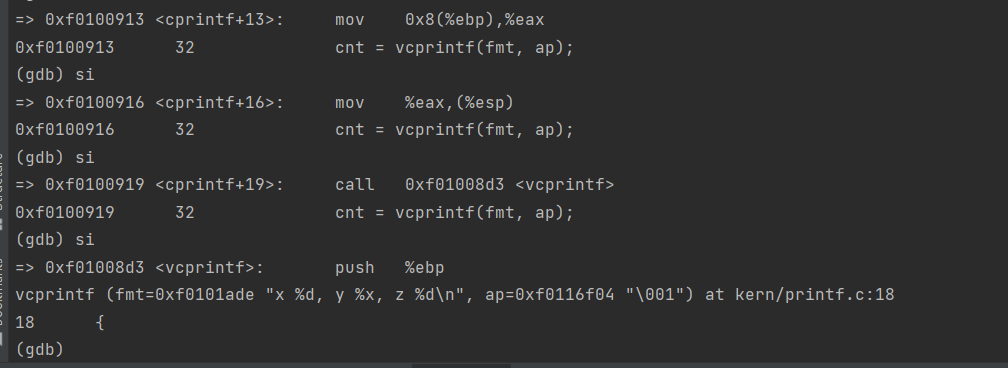
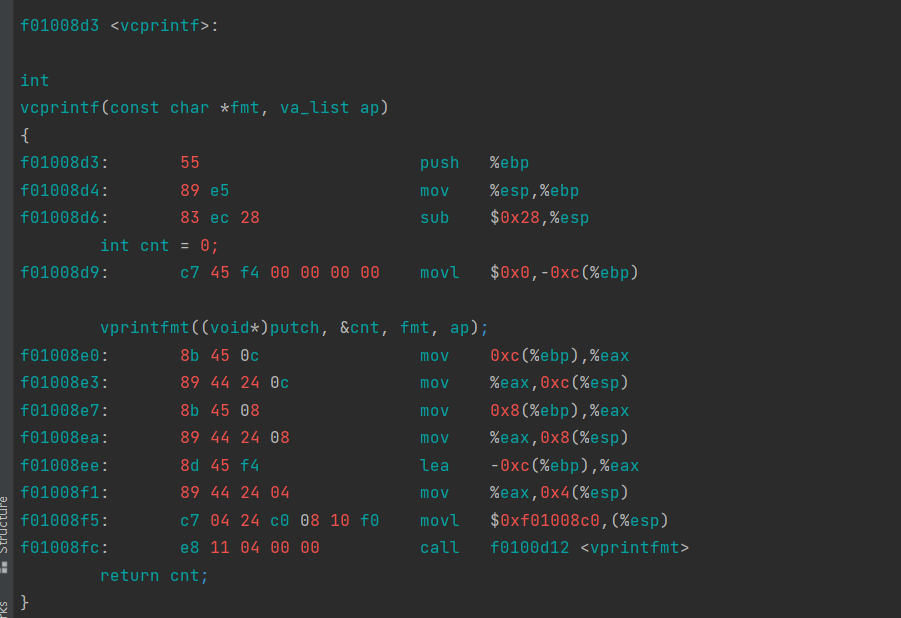
2
调用关系为 cprintf -> vcprintf -> vprintfmt -> putch -> cputchar -> cons_putc
接上图,可以看到vpprintf后是vprintfmt

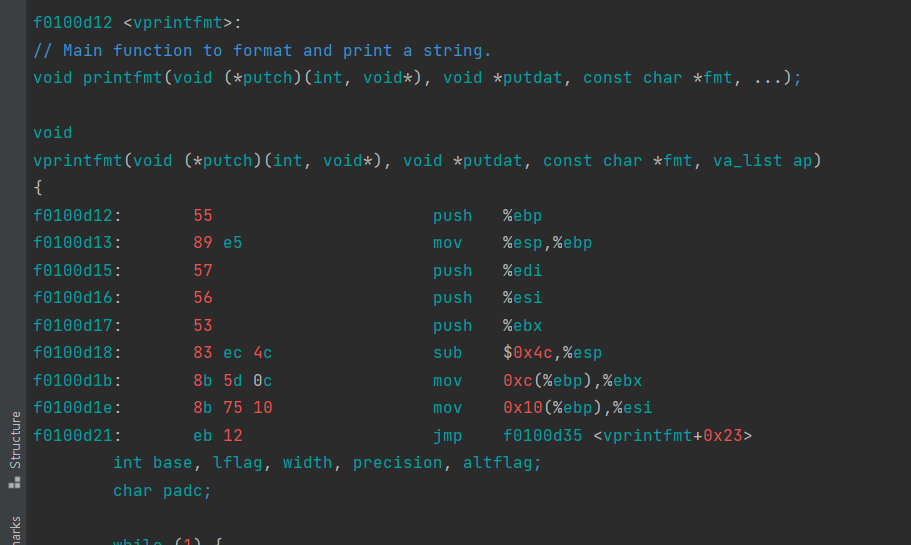
之后,vprintfmt依次调用putch和cputchar
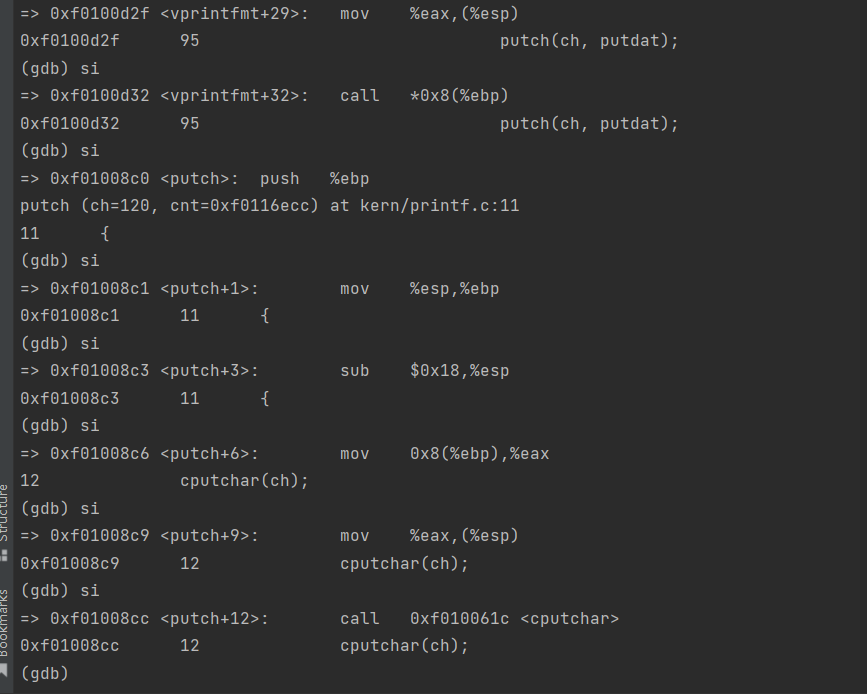
cputchar调用 cons_putc
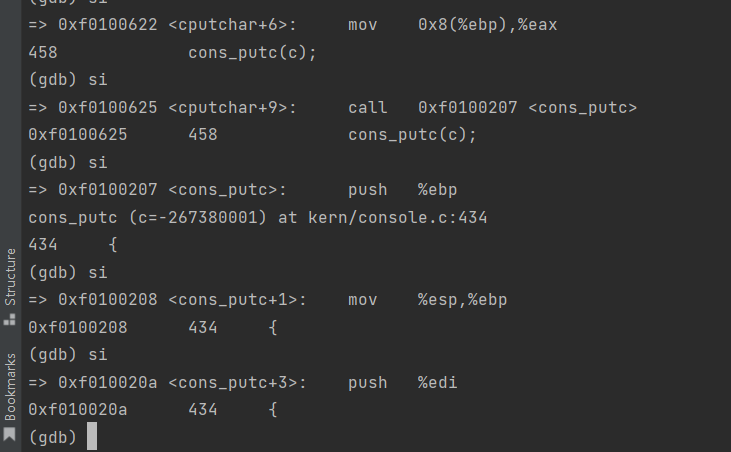


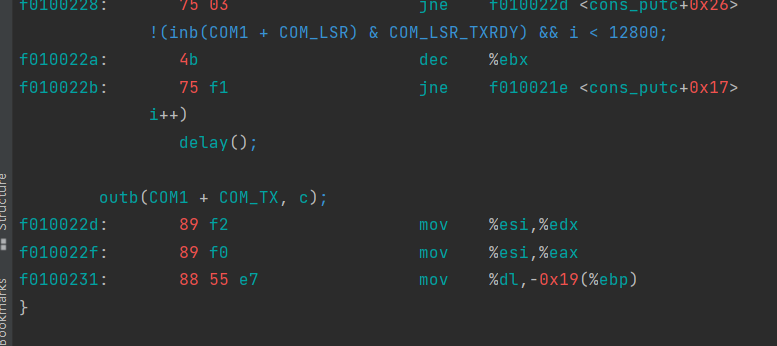
0xf010022b之后, 准备输出
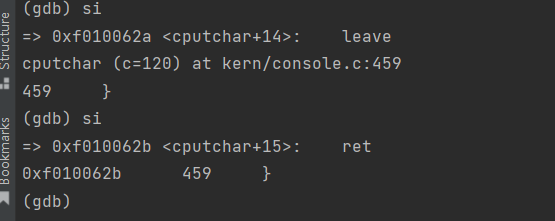

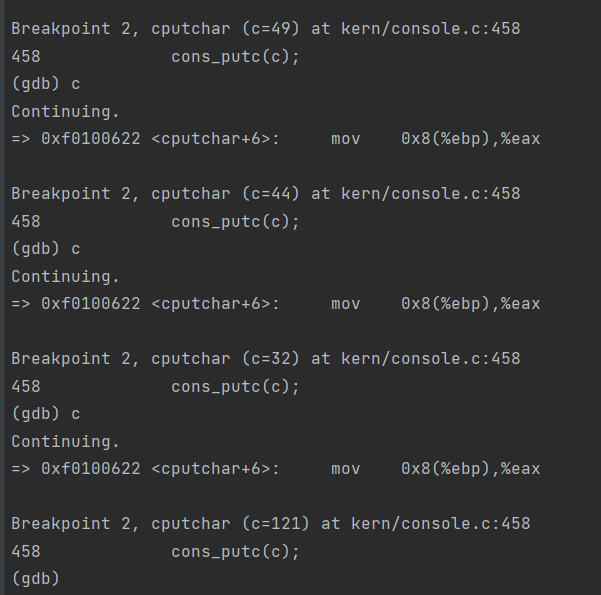
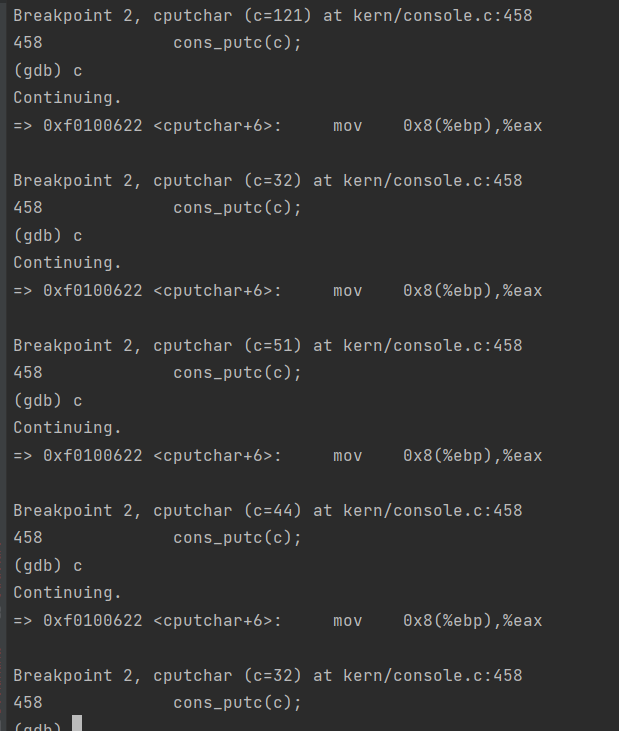

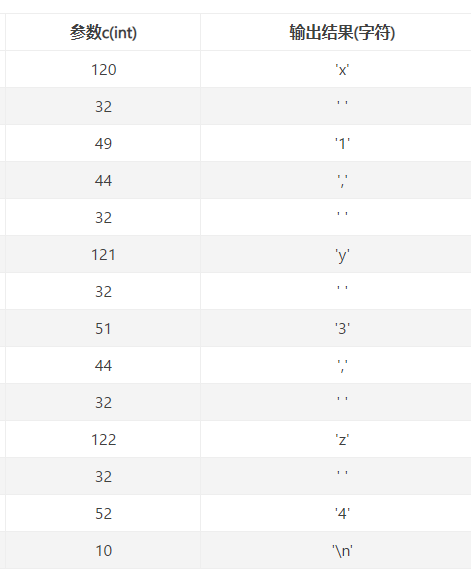
120,32, 49, 44, 32, 121, 32, 51, 44, 32, 122, 32, 52, 10
ascii 码转换为char
problem 4
Run the following code.
1 | unsigned int i = 0x00646c72; |
What is the output? Explain how this output is arrived at in the step-by-step manner of the previous exercise.
The output depends on that fact that the x86 is little-endian. If the x86 were instead big-endian what would you set i to in order to yield the same output? Would you need to change 57616 to a different value?
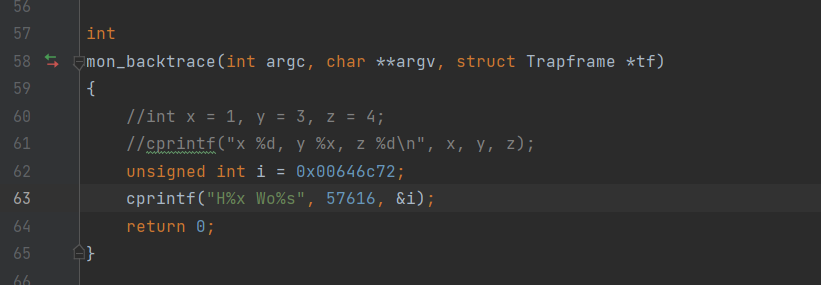

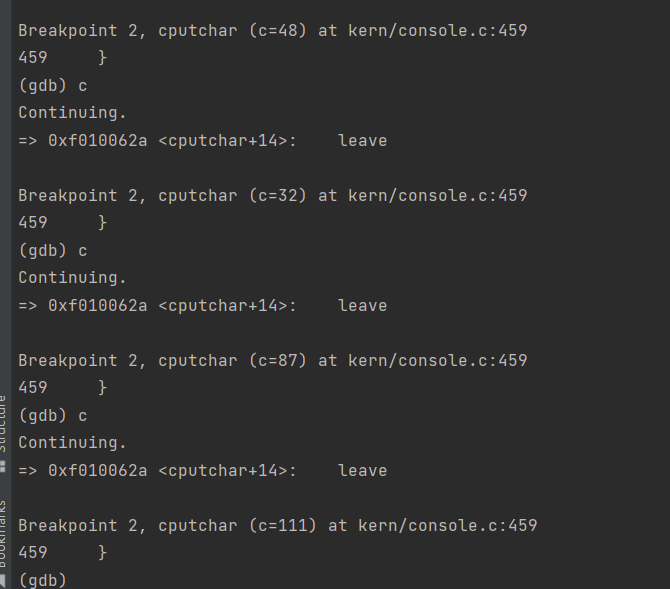

71, 101, 49, 49, 48, 32, 87, 111, 114, 108, 100
He110 World

%x 指无符号十六进制数

57616转换为16进制,正好是e110
%s指字符串,0x00646c72在小端模式下对应的ASCII码为 0x72, 0x6c, 0x64, 0x00, 可得’rld’
如果是在大端 (big endian) 模式下要得到同样的输出,应该改为:
1 | unsigned int i = 0x726c6400; |
problem 5
In the following code, what is going to be printed after ‘ y= ‘ ? (note: the answer is not a specific value.) Why does this happen?
1 | cprintf("x=%d y=%d", 3); |


y的值没有给定,所以输出一个不确定的值
problem 6
Let’s say that GCC changed its calling convention so that it pushed arguments on the stack in declaration order, so that the last argument is pushed last. How would you have to change cprintf or its interface so that it would still be possible to pass it a variable number of arguments?
The Stack
Exercise 9
确定内核初始化堆栈的位置,以及堆栈在内存中的确切位置。内核如何为其堆栈保留空间?堆栈指针初始化为指向该保留区域的哪一端?
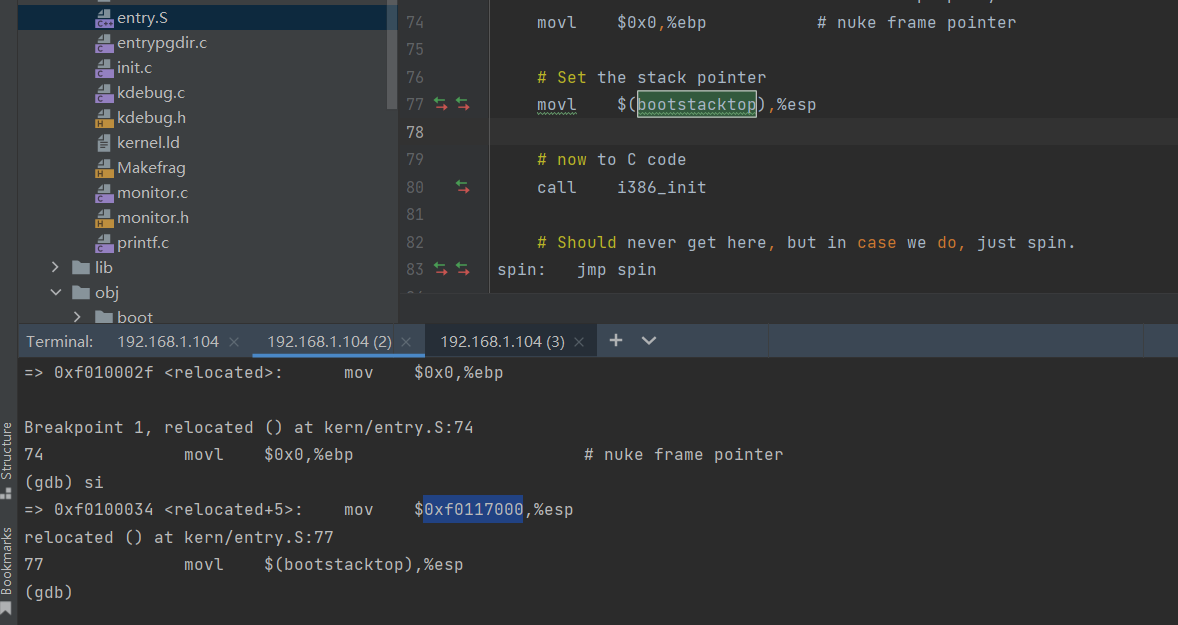
bootstacktop是栈顶,地址为0xf0117000
mmu.h中

memlayout.h


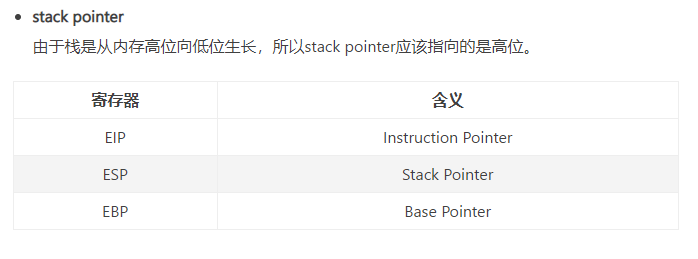
栈大小是32KB,栈顶指针存在esp,为 0xf0117000
Exercise 10
要熟悉x86上的C调用约定,请在obj/kern/kernel.asm中找到test_backtrace函数的地址,在那里设置一个断点,并检查内核启动后每次调用它时会发生什么。test_backtrace的每个递归嵌套级别在堆栈上推送多少32位字,这些字是什么?

给back_trace的test_backtrace(x-1); mon_backtrace(0, 0, 0);和 打上断点, 查看esp的初始值。

初始x传入值为5,向后执行直至x=0

中途查看esp内容,发现第二列保存的是x的值。每次递归会保存两行。每一列的意思是

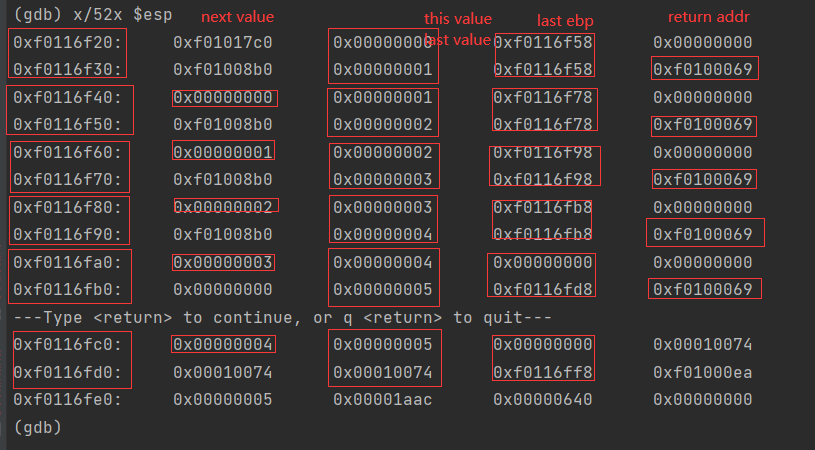
x86堆栈要倒着长,如果以为push以后esp会增加可就大错特错了。。ebp虽然叫栈底,但是永远大于等于栈顶
0xf0100069应该是test_backtrace的下一条的返回地址。
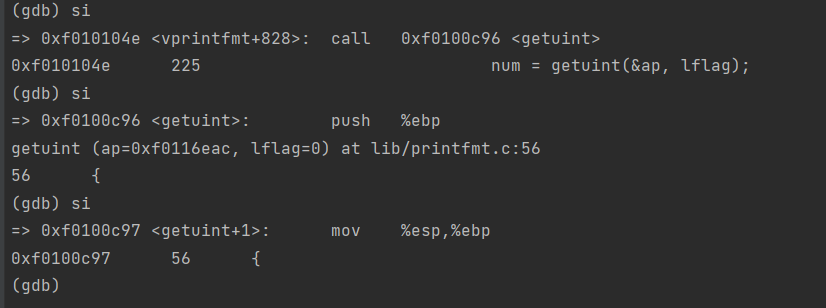
test_backtrace(5)的栈帧范围是:esp: 0xf0116fc0 ebp: 0xf0116fc8
test_backtrace(4): esp: 0xf0116fa0 ebp: 0xf0116fa8
test_backtrace(3): esp: 0xf0116f80 ebp: 0xf0116f88
test_backtrace(2): esp: 0xf0116f60 ebp: 0xf0116f68
test_backtrace(1): esp: 0xf0116f40 ebp: 0xf0116f48
next x | this x | don’t know | don’t know |
don’t know | last x | last ebp | return addr|
Exercise 11
implement a stack backtrace function
The backtrace function should display a listing of function call frames in the following format:
1 | Stack backtrace: |
Each line contains an ebp, eip, and args.
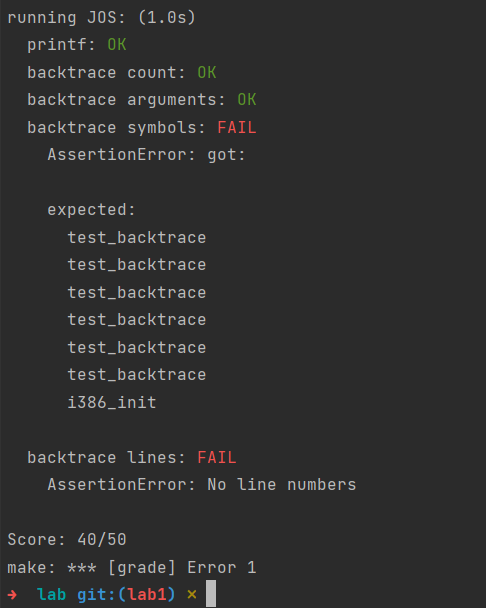
运行 make grade 这个评级脚本去查看它的输出是否是我们的脚本所期望的结果/。
1 | C函数调用时,首先将参数push入栈,然后push返回地址,接着将原来的EBP push入栈,然后将ESP的值赋给EBP,令ESP指向新的栈顶。而函数返回时,会将EBP的值赋予ESP,然后pop出原来的EBP的值赋予EBP指针。 |
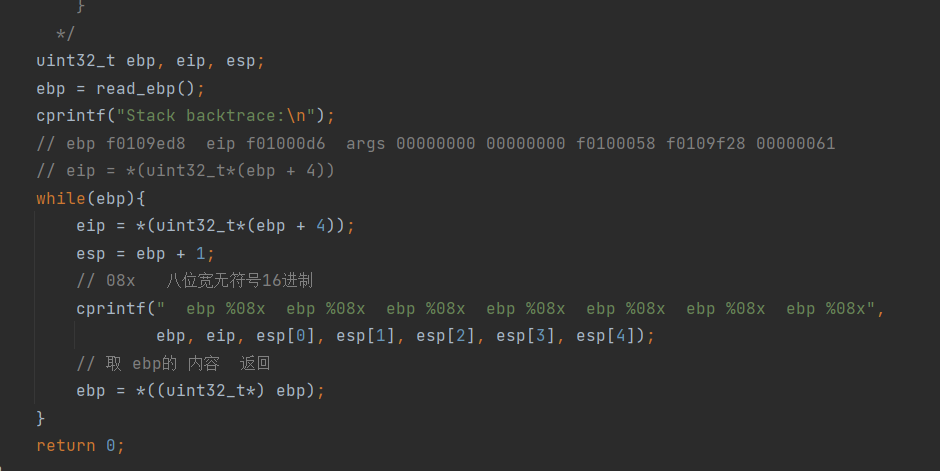
Exercise 12
修改堆栈回溯函数以显示每个eip对应的函数名、源文件名和行号。
在debuginfo_eip中,__STAB_*来自哪里?这个问题有一个很长的答案;为了帮助您找到答案,以下是您可能想做的一些事情:
- look in the file
kern/kernel.ldfor__STAB_* - run objdump -h obj/kern/kernel
- run objdump -G obj/kern/kernel
- run gcc -pipe -nostdinc -O2 -fno-builtin -I. -MD -Wall -Wno-format -DJOS_KERNEL -gstabs -c -S kern/init.c, and look at init.s.
- see if the bootloader loads the symbol table in memory as part of loading the kernel binary
向内核监视器添加一个backtrace 命令,并扩展您的实现mon_backtrace以调用debuginfo_eip并打印表单的每个堆栈帧的一行:
1 | K> backtrace |
Each line gives the file name and line within that file of the stack frame’s eip, followed by the name of the function and the offset of the eip from the first instruction of the function (e.g., monitor+106 means the return eip is 106 bytes past the beginning of monitor).
1 | /* Include debugging information in kernel memory */ |
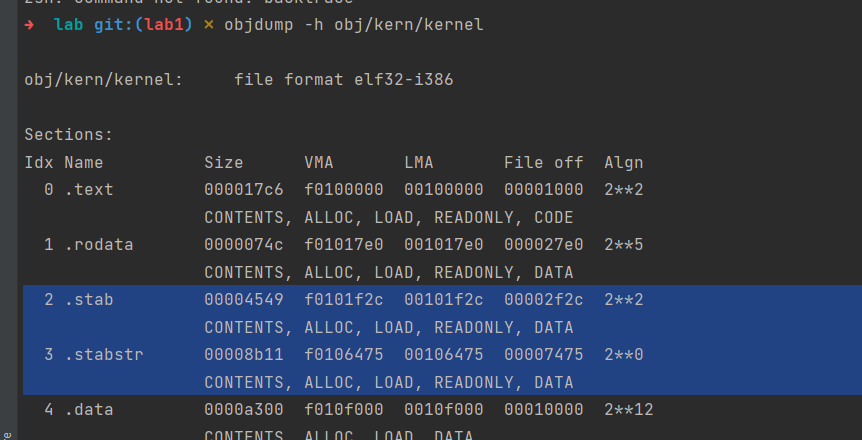
可以得到stab和 stabstr的起始地址和结束地址
1 | __STAB_BEGIN__ = 0xf0101f2c |
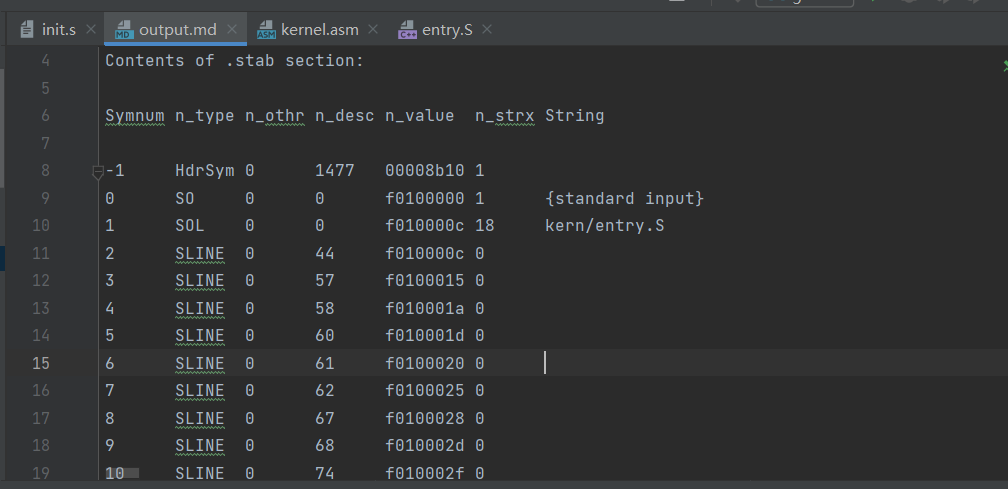
objdump -G obj/kern/kernel 列出所有stab的信息

进入内核后打个断点,查看stabstr内的内容

使用objdump -G obj/kern/kernel > output.md将内核的符号表信息输出到output.md文件
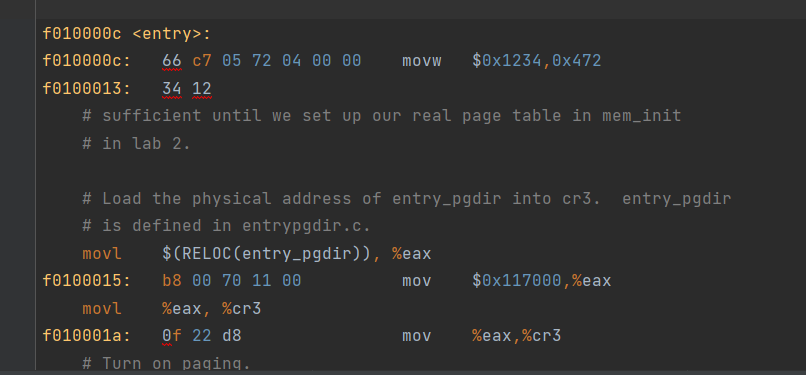
观察kernel.asm
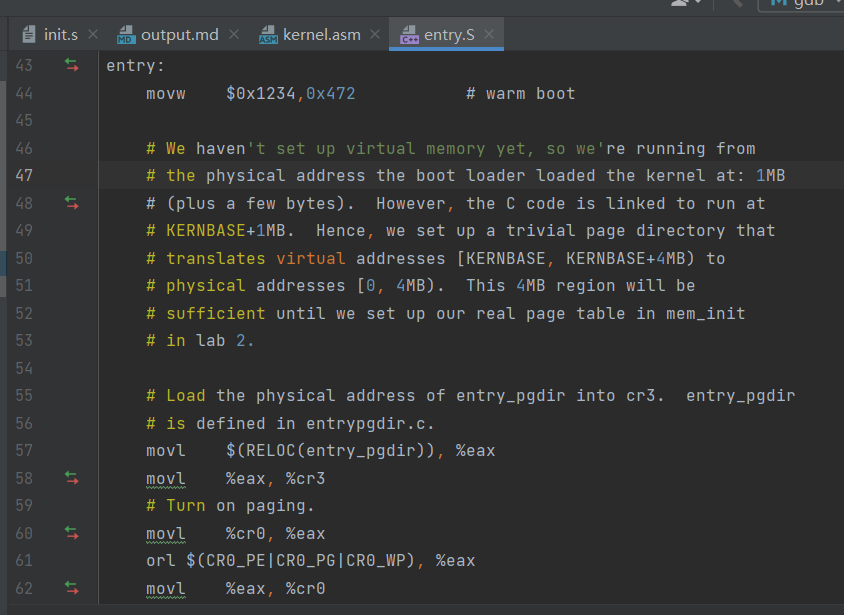
观察entry.S
可以看到,output.md 中的各个字段,
1 | Symnum 下标,整个符号表看作一个数组,Symnum是当前符号在数组中的下标 |
在查看kdebug.c时候发现函数的参数为int类型,但是传入是N_FUN,于是翻了一下stab.h
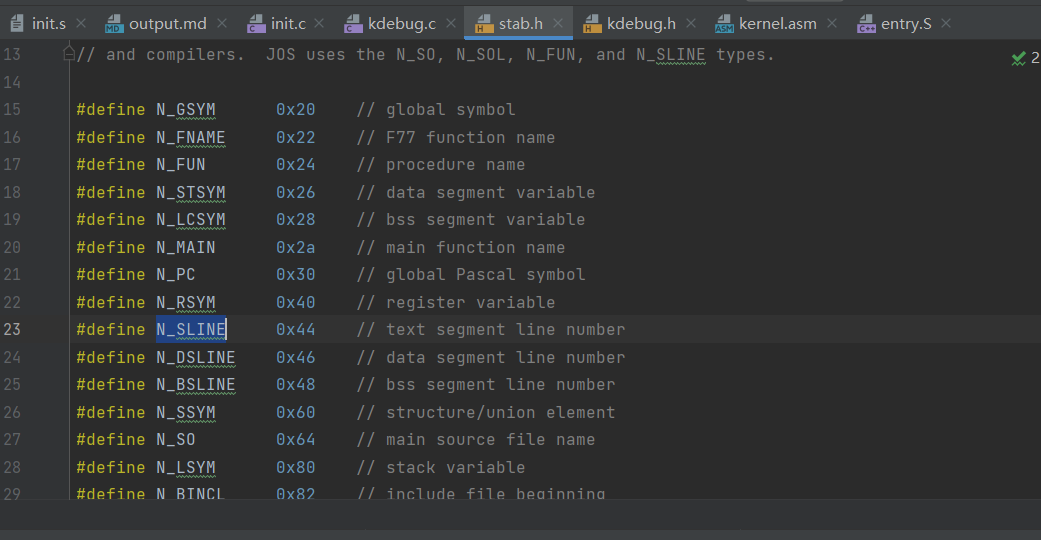
修改monitor.c
1 | uint32_t ebp; |

可以看到后续多了:F(0,15)
那么需要输出指定长度,以便把后面多余的字符删除。test_backtrace 和 i386_init 为函数名
使用eip_fn_namelen进行指定长度的输出
修改为
1 | cprintf(" %s:%d: %.*s+%d\n", info.eip_file, info.eip_line, info.eip_fn_namelen, info.eip_fn_name, eip[0] - info.eip_fn_addr); |
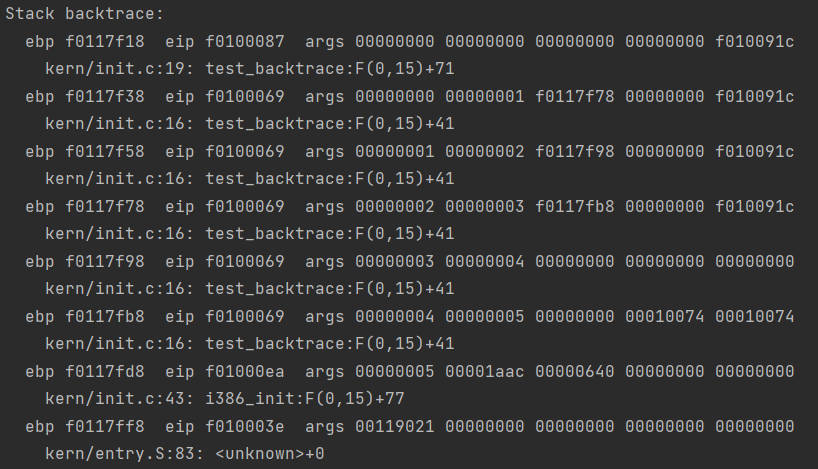
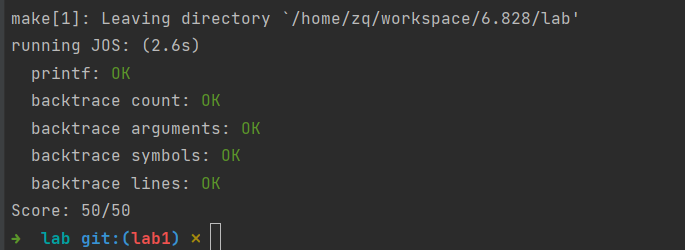
正常输出
make grade

summary
- 启动顺序 bios->bootloader->kernel
bios:
0x000FFFFF~0x0010 0000
bootloader:
sectorsize(扇区大小)是512

0x7c00~0x7dff
BIOS找到一个可引导的软盘或硬盘,它将512字节的引导扇区加载到物理地址0x7c00到0x7dff的内存中,然后使用jmp指令将CS:IP设置为0000:7c00,将控制权传递给the boot loader。
kern 入口LMA为 00100000 被映射到虚拟地址(LMA)0xf0100000
kernel最先加载的就是 .text
所作操作:开启内存分页机制,启用虚拟内存,I/O的实现,栈的初始化。